Simplemenu
for Reveal.js
Table of contents
(TOC generated by Simplemenu)
Why?
In Powerpoint you can make slides with a nice menu in which the active menu item is highlighted. That is a lot of work.
Simplemenu can do the same for you, but automatically. You will want to use this to organize your next presentation in an easy way.
What Simplemenu does
- Generates a menu of your sections and stacks
- Puts the menu in a top or bottom menubar
- And/or on any slide as an agenda or TOC
- Use the menu to navigate
- Highlights the active menu item
- Adapts the menubar to the slide background colour
On a slide like this
The bar uses the colour of your text, so it changes with a slide whose background goes the other way round.
If you want it to use a different colour, then see the Styling demo.
Menu items can only be regular horizontal slides or vertical stacks.
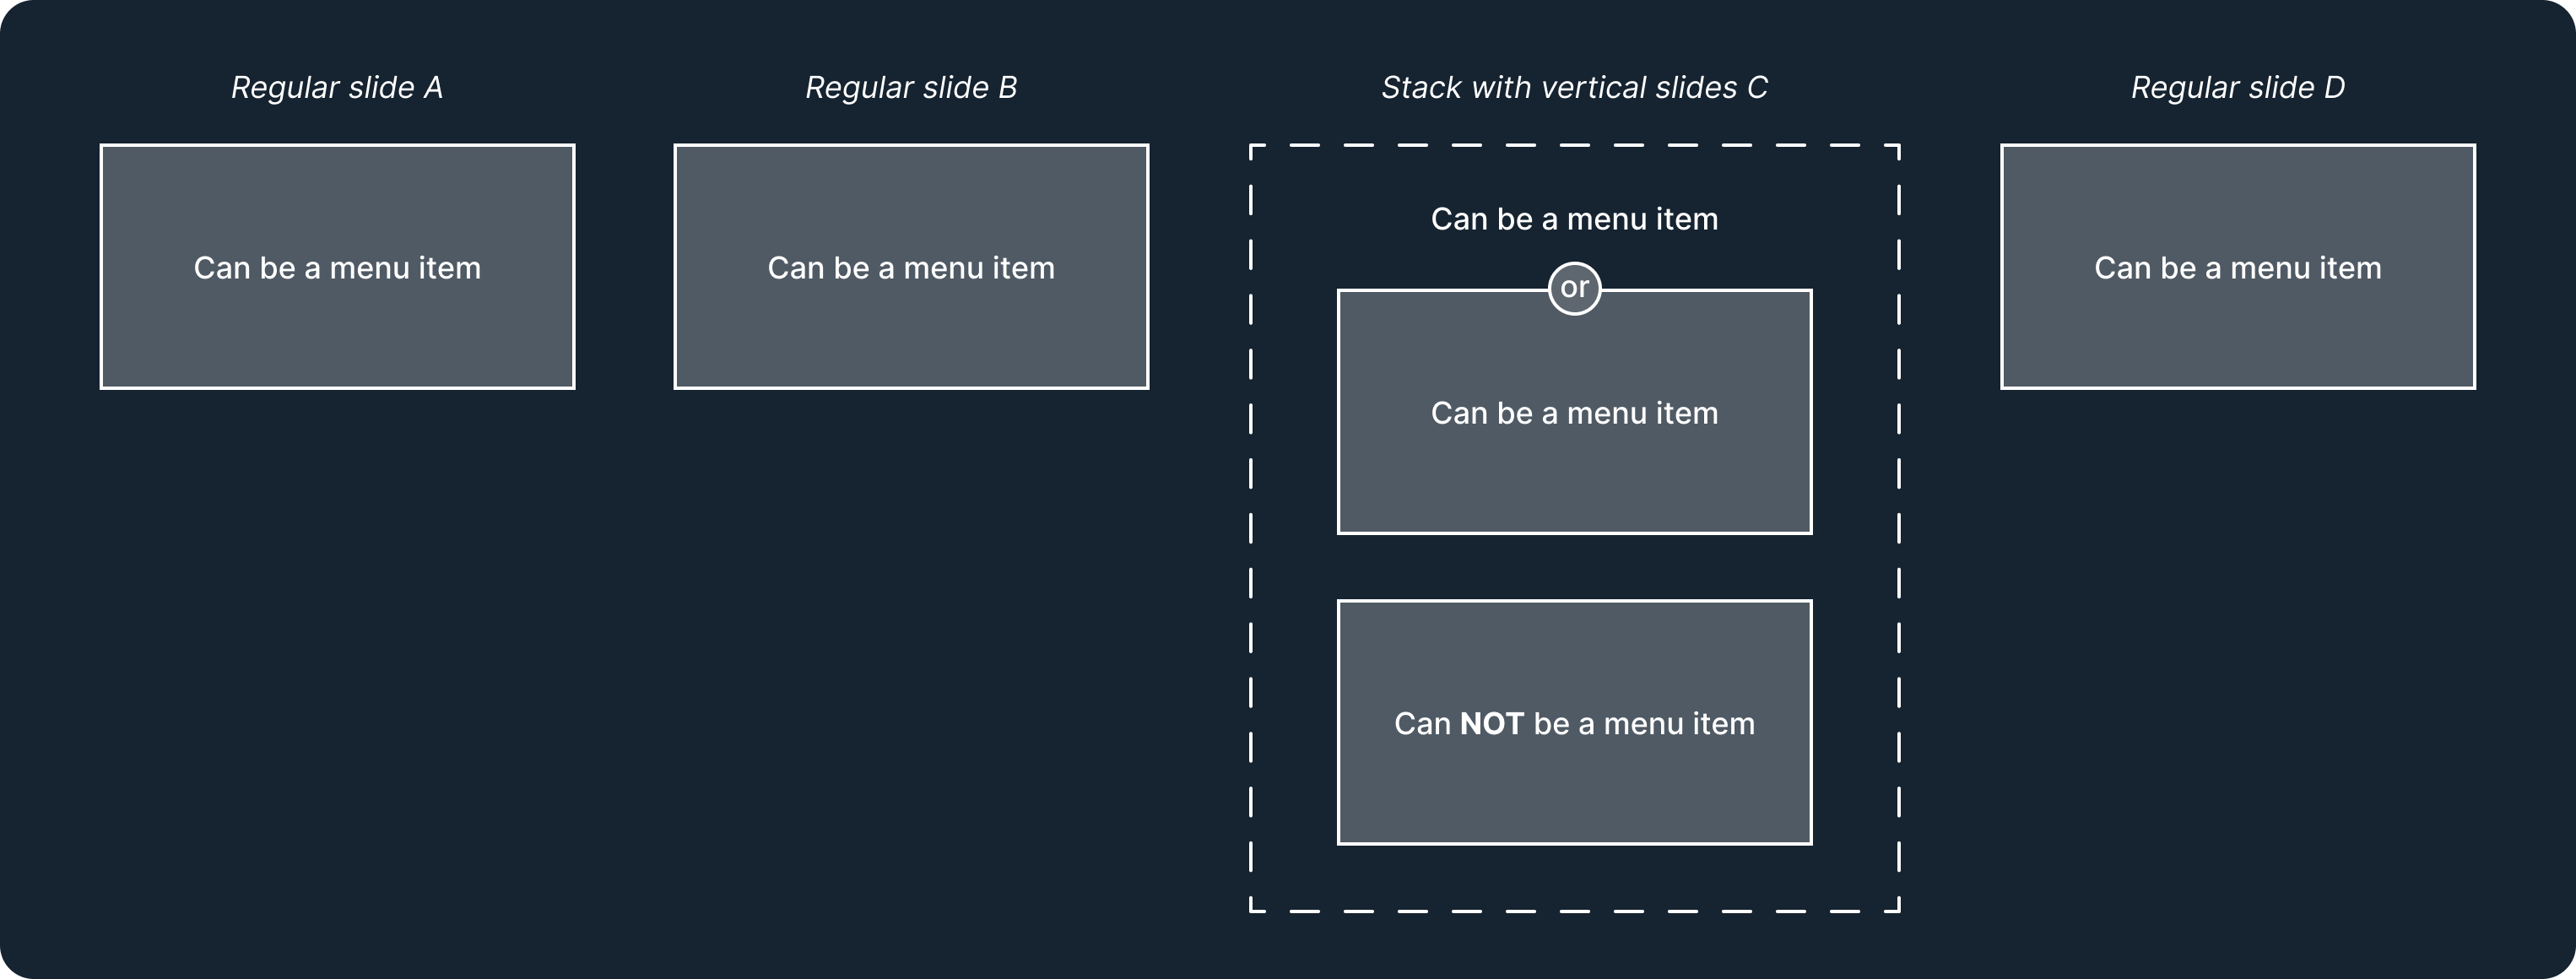
If you can’t name your stacks (like in Markdown), Simplemenu will use the name of the first slide in the stack.
Set it up
It’s easy
JavaScript
Download the plugin folder and make a reference to it in the Reveal plugin options:
(The CSS file is autoloaded, but you can also load it manually if you want to change it.)
<script src="plugin/simplemenu/simplemenu.js"></script>
<script>
    Reveal.initialize({
        plugins: [ Simplemenu ]
    });
</script>
Or install it with npm (npm i reveal.js-simplemenu) and import it:
import Simplemenu from 'reveal.js-simplemenu';
import 'reveal.js-simplemenu/plugin/simplemenu/simplemenu.css';
Reveal.initialize({
    plugins: [ Simplemenu ]
});
HTML Markup
Give your sections a data-name:
<div class="slides">
    <section>
        //...
    </section>
    <section data-name="Why">
        //...
    </section>
    <section data-name="Set it up">
        //...
    </section>
    //...
</div>
Add data-sm="false" to named sections you don’t want to show in the menu.
Markdown is also supported, see the Markdown demo.
HTML Markup
If your deck has no menubar, then Simplemenu adds one with the markup below, and fills any empty menu in it. If you add barhtml to your configuration, then yours is used instead.
Reveal.initialize({
    simplemenu: {
        barhtml: {
            header: "<nav class='menubar'><ul class='menu'></ul></nav>",
            footer: ""
        }
    },
    plugins: [ Simplemenu ]
});
HTML Markup
… or manually:
<nav class="menubar">
    <ul class="menu"></ul>
</nav>
<div class="slides">
    <section>
        //...
    </section>
    //...
</div>
HTML Markup
You can also add a TOC slide:
<div class="slides">
    <section>
        <h1>My presentation</h1>
    </section>
    <section>
        <h2>Agenda</h2>
        <ul class="menu"></ul>
    </section>
    <section data-name="What it does">
        //...
    </section>
    <section data-name="Set it up">
        //...
    </section>
    //...
</div>
Styling
Simplemenu adds a few style classes that you can add through Reveal’s data-state.
<div class="slides">
    <section data-state="hide-menubar">
        <h1>My presentation</h1>
    </section>
    <section data-name="What it does">
        //...
    </section>
    <section data-name="Thank you" data-state="hide-menu">
        //...
    </section>
</div>
hide-menubar hides the menubar on that slide, hide-menu hides the menu on that slide.
Both will use animation to transition in and out.
That’s it!
The setup above is the default (auto) way of linking the menu with the sections.
There is also a manual way, where the author creates the links in the menu(s) manually. See demo-manual-dataname.html.
Options
- activeclass
- activeelement
- barhtml
- cssautoload
- csspath
- flat
- menubarclass
- menuclass
- rtl
- scale
- selectby
Option 1: activeclass
The activeclass option is the class an active menuitem gets.
Reveal.initialize({
	//...
	simplemenu: {
	    activeclass: "active"
	},
	plugins: [ Simplemenu ]
})
Option 2: activeelement
The activeelement option sets the item that gets the active class.
Reveal.initialize({
  //...
  simplemenu: {
    activeelement: "li"
  },
  plugins: [ Simplemenu ]
})
You may want to change it to the anchor inside the li: activeelement: 'a'.
Option 3: barhtml
If your deck has no menubar, then Simplemenu adds one and fills any empty menu in it. The default markup below uses your menubarclass and menuclass.
Reveal.initialize({
  //...
  simplemenu: {
    barhtml: {
      header: "<nav class='menubar'><ul class='menu'></ul></nav>",
      footer: ""
    }
  },
  plugins: [ Simplemenu ]
})
Option 3: barhtml (continued)
If you write your own barhtml, then Simplemenu uses it exactly as it is. The classes in it have to be the ones you set.
Reveal.initialize({
  //...
  simplemenu: {
    menubarclass: "sm-bar",
    menuclass: "sm-menu",
    barhtml: {
      header: "<nav class='sm-bar'><ul class='sm-menu'></ul></nav>"
    }
  },
  plugins: [ Simplemenu ]
})
Option 3: barhtml (continued)
You can also move the slide number or the controls to your header or footer. If they are nested there manually, or through the barhtml option, they will then display inside that header or footer.
Reveal.initialize({
  //...
  simplemenu: {
    barhtml: {
      header: "",
      footer: "<nav class='menubar'><ul class='menu'></ul><div class='slide-number'></div></nav>"
    }
  },
  plugins: [ Simplemenu ]
})
Option 4: cssautoload
Simplemenu will load the CSS if this is set to true.
Reveal.initialize({
    ...
    simplemenu: {
        cssautoload: true
    },
    plugins: [ Simplemenu ]
})
If you import reveal.js-simplemenu from npm, you will need to import the CSS file yourself. If you use 'import', then csspath should be set to false. If you know the path to the CSS file, you can use the csspath option and keep cssautoload set to true.
Option 5: csspath
Simplemenu finds and loads its own stylesheet. If it cannot find it, then csspath is how you say where it is.
Reveal.initialize({
	//...
	simplemenu: {
	    csspath: "plugin/simplemenu/simplemenu.css"
	},
	plugins: [ Simplemenu ]
})
If you import the stylesheet yourself, then set csspath: false. To change how the menubar looks, use the CSS variables.
Option 6: flat
Sometimes you’ll want to limit your presentation to horizontal slides only. To still use ‘chapters’ with several slides, you can use the flat option. By default, it is set to false, but you can set it to true. Then, when a data-name is set for a slide, any following slides will keep that menu name. See Flat navigation.
Reveal.initialize({
	//...
	simplemenu: {
	    flat: true
	},
	plugins: [ Simplemenu ]
})
To stop inheriting the previous slide menu name, start a new named section, or add data-sm="false" to your slide.
Option 7: menubarclass
The menubarclass option sets the classname of menubars. Change it if another plugin already uses that name. Simplemenu still styles the bar, because it writes simplemenu-bar onto it as well.
Reveal.initialize({
	//...
	simplemenu: {
	    menubarclass: "menubar"
	},
	plugins: [ Simplemenu ]
})
Simplemenu will show the menubar(s) on all pages. If you do not want to show the menubar on certain pages, use data-state="hide-menubar" on that section. This behaviour also works when exporting to PDF using the Reveal.js ?print-pdf option.
Option 8: menuclass
The menuclass option sets the classname of the menu. Change it if another plugin already uses that name. Simplemenu still styles the menu, because it writes simplemenu-menu onto it as well.
Reveal.initialize({
	//...
	simplemenu: {
	    menuclass: "menu"
	},
	plugins: [ Simplemenu ]
})
Simplemenu looks inside this menu for list items (LI's).
Option 9: rtl
When rtl (right-to-left) is set in the Reveal.js options, the menubar follows it: the menu items start on the right, and anything else in the bar changes sides with them. If you want something else than what Reveal does, then set it in the Simplemenu options.
Reveal.initialize({
	//...
	rtl: true,
	simplemenu: {
	    rtl: false
	},
	plugins: [ Simplemenu ]
})
A bar that is given its own rtl keeps that direction, also when a plugin such as Internation changes the language while the deck runs.
Option 10: scale
When you have a lot of subjects/chapters in your menubar, they might not all fit in a row. You can then tweak the scale in the options. Simplemenu copies the Reveal.js (slide) scaling and adds a scale option on top of that.
Reveal.initialize({
	//...
	simplemenu: {
	    scale: 0.67
	},
	plugins: [ Simplemenu ]
})
It is set to be two-thirds of the main scaling.
Option 11: selectby
This option is only needed when adding a menu manually. You then need to link sections to the menu items. The selectby option finds the active slide or stack.
Reveal.initialize({
	//...
	simplemenu: {
	    selectby: "id"
	},
	plugins: [ Simplemenu ]
})
By default it is 'id', but can also be set to 'data-name'. If set to data-name, Simplemenu will compare the text content of the link to the section. Then <a href="#">What it does</a> will link to <section data-name="What it does"></section>.
Demos
See all demos on the main Simplemenu page.